Ask Andrew – Preparing your boat for winter – Part two
Oct 25, 2018
build a ridgepole of 2×4’ and 1×2’s on the foredeck of a cruiser
DIY Shrink-wrap
Last time, I described the importance of covering your boat to protect it for the winter, and listed a few options and discussed their pros and cons.
This edition, I’d like to delve into the process of shrink-wrapping. Many find this to be the optimal method of winter protection.
Shrink-wrapping is a bit of a mystifying art to a person who has never done it before – and I have yet to see a first-timer wrap a boat perfectly. That said – it is highly gratifying, and quite cost effective (over time) to shrink-wrap a boat yourself versus paying a contractor to perform this work
The Tools:
a) A roll of Shrink-wrap – Purchased through a contractor, marine supply store, or wholesaler. Along with the wrap itself purchase a roll of shrink tape and adhesive.
b) A heat shrink gun (or any sort of propane torch): I use a torch designed to burn off weeds, purchased from a farm supply store!
c) Propane hose and Tank (such as can be used on a BBQ)
d) Cordage: can be bought along with shrink-wrap – but high-quality, low-stretch and heat resistant twine can also be used. I prefer flat, braided cordage, designed to be used with shrink-wrap
e) Lumber: 2×4’s and 1×2’s – from a lumber yard
f) 2” wood screws
g) A power drill
h) Padding: pieces of carpet, cardboard, foam or pad
i) A jig-saw or handsaw for cutting lumber to length
j) A measuring tape – preferably the flexible roll type
The Method:
1) You’ll need to take a few measurements aboard before buying your supplies. Shrink-wrap comes in a variety of widths and lengths. What you’ll need to buy will be dependent on the ridgeline, or ridgepole that you’ll build with 2x4s on the boat’s deck.
The Ridgepole supports will be vertical 2x4s, and the length of the ridgepole will be of 1x2s. The ridgepole will be curved, running from bow pulpit to transom, with supports every 8 feet or so. Therefore, a 12’ boat will only need one support, but a 35’ boat will need 3.
Amidships, the ridgepole supports should be tall enough so that the angle from ridgepole to gunwale is anywhere from 30-45 degrees (so that snow, rain and ice will slide off the wrap)
2) Use cordage and tie from each ridgepole to cleats or stanchions, providing lateral support (we don’t want the ridgepole to fall over or collapse).
3) Next, use cordage to wrap around the width of the hull. The cordage should be as tight as possible, and mid-way between the waterline and gunwale of the boat.
 Shrink-wrap has been measured and draped over the boat
4) Once the ridgepole has been built and supported, we can measure to determine the length of width of shrink-wrap required.
Length – from the cordage at the bow, over the bow, along the ridgepole, over the transom to the cordage on the transom’s hull.
Width – at the boat’s beam (the widest point), measure from port to starboard, over the ridgepole. Add about 18”.
5) Once you’ve sourced, purchased, and cut to length your shrink-wrap, it needs to be draped over the boat, with the ends tucked under the cordage on the hull. Keep the wrap hand-tight (there shouldn’t be a lot of slack), but don’t use excessive force at this point. The wrap has yet to shrink – if it’s pulled too tight too early, it will shrink and put pressure on stanchions or deck hardware causing damage!
6) Next – use the heat gun to tighten the folded edge on the hull. Work your way down one side of the boat, then the other – heat up the wrap, and tap it with a gloved hand, creating a seam
 The bottom edge is wrapped around cordage, creating a seam or hem
7) Use cordage to tie the seams together from port to starboard, under the belly of the boat. As the shrink-wrap tightens, this cordage will prevent the seam from rising.
8) Continue heating the wrap. Work your way slowly from seam to gunwale, from bow to stern.
9) Once the lower section has tightened up, move again from bow to stern, but from gunwale to ridgepole. Try to hit every part of wrap with heat, until all the wrinkles are out. Sometimes it’s helpful to heat once, let it cool, and return again in ten minutes or so to re-heat.
10) During this process, you may see that seams, holes or marks have developed in the wrap – these can be fixed by covering over or repairing using shrink-tape which works the same way that tape works, but also shrinks and tightens as it’s heated.
11) Add vents at high points on the wrap to allow airflow and any humidity to escape.
A few extra notes:
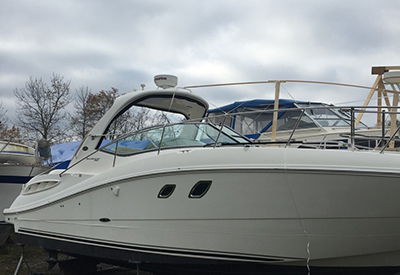
 Completed smaller boats
Try to make sure that the boat is clean and dry before shrink-wrapping. If bilges have water, if damp or wet covers or lines are left inside the wrap, they can lead to mildew or mould over time.
While shrinking, you’ll be working with a live flame – please keep a fire extinguisher handy, just in case. Shrink-wrap is designed to heat and melt, not burn – but accidents are possible. Please take care.
If you find that shrink-wrapping isn’t for you, there are likely many contractors available who can do this work for you.

Andrew McDonald is the owner of Lakeside Marine Services – a boat repair/maintenance firm based in Toronto. Andrew has worked in the marine industry for 12 years and is a graduate of the Georgian College ‘Mechanical Techniques – Marine Engine Mechanic’ program.