Smarter Spring Commissioning
By Jonathan Paetkau
Understanding how systems really work – and degrade over the winter – can help you prepare your boat for a trouble-free season. Here’s a guide from a pro…
Sometimes the most daunting thing about launching your boat in the spring is slogging through the checklist designed to “help” you do it. And no wonder: commissioning efforts for Canadian boaters run the gamut from paying a full-service yard to re-commission every system on board to putting away the one lonely space heater that’s been wheezing away on the salon floor since Thanksgiving.
So this, gentle boater, is not an attempt to tell you what to inspect, test, lubricate, purge, fill, loosen, tighten, top up, or tear apart in the process of spring commissioning. Rather, we’ll illustrate some of the many ways in which boat systems may be damaged or fail, especially in the cold, damp darkness of winter.
It can be a long road, one that even “experts” struggle on, but a solid understanding of how your boat systems really work — and stop working — can help you tailor the commissioning process for your boat and your circumstances.
Hull and Deck
One of the most misunderstood elements of boat maintenance is the material most recreational boats are made of: polyester resins. While they’re quite stable, they do suffer from ultraviolet (UV) degradation – and surprisingly, they all break down in the presence of water, albeit very slowly. Of the various resins used in boat construction, it’s the pigmented gelcoat layer on the outside that needs the most attention.
One of the strengths of gelcoat is that it is chemically bonded to the structure of the hull, but it has its drawbacks. It’s quite soft and porous compared to paint and breaks down relatively quickly in the sun, as well as with repeated cycles of cold and warm, wet and dry. This makes the surface first dull, then chalky, and ultimately visibly porous. As oxidation worsens, it accelerates – microscopically, the surface becomes much rougher, exposing more of it to the elements – and the gelcoat gets uglier and harder to clean. Eventually it stops protecting the underlying resins; because these don’t have UV blockers and pigments, they are even more vulnerable.
Fortunately, the remedy is simple and satisfying. Gelcoat needs to be polished regularly, then waxed. Few things can restore your pride in your boat like making it gleam, and the feeling can inspire all kinds of other worthwhile efforts! It’s a good idea to polish and wax deck surfaces as well. You and the sun are beating on them constantly so they degrade even more quickly than topsides, but they don’t get polished nearly as often. It’s a more complicated process because of intricate shapes, fittings and non-skid areas, but the smooth parts of the deck should be polished and waxed, and there are good non-skid cleaners that leave a protective coating.
Painted boats have a simpler time of it but the same degradations afflict them. They will also benefit from a good washing and coating with a wax or a proprietary polymer coating (most of these work very much like waxes). On both painted and gelcoated boats, dirt and salt accelerate oxidation so regular gentle washing is of huge benefit.
Underw ater
ater
In case you thought things were more serene underwater, there too things are breaking down all the time. If there’s no epoxy barrier coat under the antifouling paint, water is penetrating the gelcoat. This is a slow-moving problem, but applying epoxy to the bottom before it’s blistered is one boat expenditure that might just stay in the resale value.
The antifouling is also breaking down, although different types behave quite differently. So-called “hard” or contact-leaching paints continue to release biocide, and in the process the paint film becomes more porous and unstable. If your boat lives out of the water for the winter, it’s important to know that hard paints can become inactive in air, so that even when they’re back in the water they no longer release biocide. They need to be re-coated before launching.
Traditional ablatives, on the other hand, really do need the action of water against the hull to wear away the paint, so when the boat isn’t moving they don’t work effectively. When the paint’s not wearing away, it’s not releasing biocide, so it can get dirty, then flaky and uneven. That’s just one of many good reasons to use your boat in the winter! Ablative bottoms that are out of the water all winter will benefit from a light pressure wash before launching.
Whether or not to repaint in the spring can be a difficult question, depending first on the type of paint you use. Think about the fundamentals: how does the paint release its biocide, is there any left in the paint that’s on the boat, and will it continue to be released effectively? With ablative or hybrid paints (Interlux Micron, for example), more coats will get you more seasons without recoating (and these hybrids, or self-polishing paints, fare better out of the water). Most Canadian waters do not see heavy fouling, however, so with a dive or pressure wash, two seasons should be the norm.
 Thru-hulls are perhaps the thorniest of spring-commissioning headaches. If you’ve got ball valves, it’s easy to “check” them visually and turn the handle 90 degrees, but this often fails to tell the whole story. The balls, like the gates in older-style gate valves, often seize open, closed or in between. If you’re lucky the handle won’t move and you’ll know there’s a problem. But the handle may corrode off the ball as well, so the handle moves normally and the valve feels like it’s working.
Don’t depend on the “handle” test: if the boat is out of the water it’s worth looking up the valves from outside with a flashlight. Check the balls as you move the handle: confirm that they’re closed and check their condition. If the boat is in the water, you can often test thru-hulls by closing them and making sure they really do stop the flow. All thru-hulls should be worked at least every few months to prevent them from seizing.
Corrosion kills bronze thru-hulls and it too can be hard to spot. Often, the visible surfaces of hardware are either painted or look fine. If you can chip a bit of bottom paint off the outside of a thru-hull or look at the metal on the unpainted inside, you may see a pinkish hue that indicates that zinc is leaching out of the bronze alloy, making the material weak and spongy. If a fitting is red or pink, it should be replaced.
Engine and Systems
Oils and fuels break down over time, and this process accelerates with exposure to air, moisture, and fluctuations in temperature and humidity. Thus the perennial advice to keep fuel tanks full, to reduce condensation inside, and treated with stabilizers and biocides. But these processes happen inside engines as well, especially when they’re not running.
Water in the engine from the cooling and exhaust system is an obvious problem, but condensation can form inside the engine from moisture in the surrounding air. This can cause dirt buildup in air filters as well as corrosion in the engine, which can go unnoticed until the engine dies an early death. One way oil protects the engine is by holding contaminants in suspension, but over time these suspended sediments settle and accumulate, making them harder to remove. Also, the by-products of combustion become acidic and can attack bearings and seals inside the engine.
The best defence is to change fluids and filters both before and after winterizing; before, to get rid of the by-products of combustion and replace oil that’s been stressed from heat and wear, and after, to remove moisture and contaminants that accumulate when engines are not run. It also helps a great deal to keep the ambient temperature in the engine compartment stable and circulate warm, dry air (see sidebar “Ventilate, Ventilate”).
Exhaust systems – manifolds, risers, elbows, mufflers – are a special case, a playground of electrochemical destruction. And they’re hard to inspect, so hopefully they were drained in the fall. It’s hard to overstate the value of a good mechanic here; preferably someone who services the boat year after year, so the engines’ long-term needs are looked after systematically.
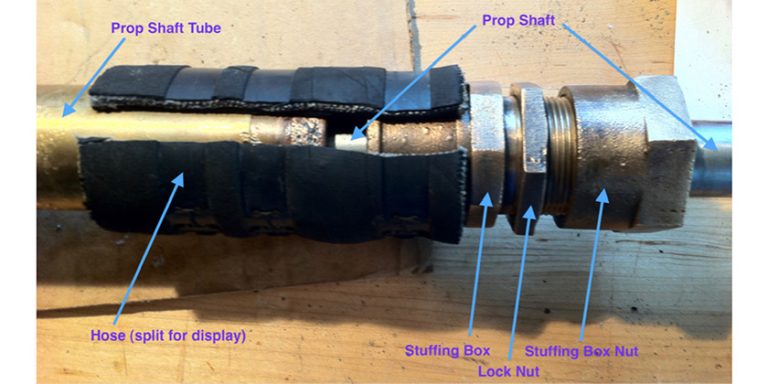
Downstream of engines things are a little simpler, but hoses, shaft seals and cutless bearings can be damaged by freezing, shaft seal packing can dry out, and galvanic corrosion never stops. Most boats need their anodes changed at least once a year, and this is usually straightforward. A more insidious enemy is crevice corrosion, which afflicts stainless steel that is in contact with stagnant salt water, inside a stuffing box or cutless bearing, for example. Over time, the water becomes de-oxygenated and the oxide layer that makes stainless stain less breaks down, and the steel begins to get eaten away. The best defence is simply to use the boat as often as possible.
 Plumbing
Beyond the obvious problem of freezing, there are a few less dramatic things that beset a boat’s plumbing systems over the winter, some of them preventable. Tanks or hoses that are partly full are a breeding ground for mold and bacteria, which can be hard to get rid of. The best preventative is to drain the whole freshwater system; this will also eliminate condensation in and on the tanks. Sea water and waste standing together will form mineral deposits that stick to the inside walls of waste-system hoses, reducing their diameter and all but guaranteeing a blockage.
Everywhere that hoses are clamped onto fittings there is expansion and contraction that goes with changing temperatures. Loose connections and tired hoses may lie in wait all winter only to blow up as soon as the pressure is on.
Most water pumps survive the winter reasonably well but centrifugal bilge pumps can be defeated by debris accumulating in the bilge. If the pump has worked a lot over the winter, the motor can burn out, and sometimes the shaft that drives the impeller can shear so the motor will run and you might think the pump is working, but it’s not moving any water.
Hose clamps and metal fittings corrode more quickly over the winter, so expect more failures when systems are pressurized for the first time in months. While visual inspection can reveal an impending clamp failure, it’s easy to miss the weak spot, often under the screw, so it’s a good idea to put all water systems – including bilge pumps – through their paces before the season really starts.
 Electrical
Every electrical system depends on good contact, so corrosion, which is generally a poor conductor, is the great menace here. While it’s easy in principle to prevent, it can be hard in practice; sometimes, it’s even hard to see. Corrosion can wick its way surprisingly far up wires, for example, and the increased resistance reduces voltages, so some appliances don’t work as well and small-current systems, like electronics and bonding, stop working altogether.
Corrosion also leads to the buildup of heat, which increases resistance even more; in extreme cases insulation can melt and the door is open to short circuits and fires. While it’s worst in places that are wet and where the air is stagnant, corrosion can also happen inside switches and junction boxes, breaking circuits in some places and bridging them in others. The best defence is to use proper tinned marine-grade wiring and heat-shrink terminals, and to keep the air inside the boat dry and well circulated.
Most boats these days have chargers on the batteries all winter, which is a good idea and essential to keep bilge pumps running. This means that heat and hydrogen are being produced, so once again ventilation is needed. If the batteries are the flooded type, they will lose some electrolyte in the charging process, so they should be topped up with distilled water. If they’re not on a charger, they can self-discharge over the course of a few months.
 Rigging and Deck Hardware
UV, heat and salt do the most damage to deck hardware and mountings, so it’s comforting to know that our climate is fairly kind to exterior fittings. In our climate sailboat rigging is done in by fatigue as often as by corrosion, but unlike corrosion, which shows up in broken strands, stained covers and brown terminals, fatigue can’t be seen. The extent of it depends on how heavily, and how often, it’s loaded up. Inspection by an experienced rigger is a worthwhile step.
Windows are a perennial source of leaks, chiefly because whatever they’re made of, they expand and contract with temperature changes at different rates than the surface they’re mounted to. This strains sealant or gaskets, which also lose elasticity over time. The same expansion and contraction, as well as cycles of wet and dry, will break bonds between deck hardware and deck, so even fittings like cleats and window frames, which don’t seem to get a lot of movement (unlike say, stanchions) will eventually leak. Water entry can cause real problems in cored decks, too, saturating them and breaking the bond between deck skins and core; if the water freezes it’s the marine version of frost heaves.
Some hardware failures are easier to prevent. Many boats, in well-intentioned efforts to eliminate chafe, have too much tape around rigging fittings. This can trap moisture next to the stainless and cause crevice corrosion, which can also afflict fasteners that leak very slowly.
The all-time star of time-wasting deck work is corrosion between dissimilar metals, or galvanic corrosion. Uncoated stainless steel fasteners, for example, can get so firmly seized in place by corrosion (which on a molecular level is much larger than the metal it’s eating and fills the spaces between male and female threads) that the heads shear off when you try to remove them…and then they have to be painstakingly drilled out. Sometimes this can be seen early enough to remove the fastener and apply an anti-seize, which should be standard practice; look for traces of white or tiny bubbles or cracks in the paint around the fastener head.
We hope that understanding the destructive processes at work aboard your boat will make them less scary. And knowing why things break down will help you prevent it, fix it, or at least identify it. The more you use the boat – and the better you know it – the happier you and the boat will be. If the boat hasn’t moved in months, plan to spend a day on board at the dock or head out for a short shakedown cruise, putting all of the boat’s systems through their paces, before you get too far from home.
Jonathan Paetkau is an owner of Skookum Yacht Services in Vancouver, where he’s been fixing and maintaining boats – and not doing enough winter sailing – for many years.
SIDEBAR
Ventilate, Ventilate
One of the very best things you can do for your boat over the winter – for the engine, wiring, upholstery and everything else on board – is to ventilate it well. We see a lot of heaters and dehumidifiers, but very few boats that are truly well ventilated in storage. The ideal scenario is to bring in fresh air from outside at one end of the boat, warm it up immediately, and move it fairly swiftly out the other end of the boat.
A small exhaust fan with enough airflow to replace all the air in the hull several times a day is great. It’s also important to open up every space as much as possible, including bilges. Warming doesn’t have to be extreme – just a few degrees above the outside air temperature (and above freezing, of course) will keep a boat fresh and dry and prevent mildew and condensation. But moving the air – into, around and out of the boat – is just as important as heating it.
Your marina neighbours will thank you for not hogging the amps, too, since fans draw so much less current than heaters.
Click to Read More Spring Commissioning
Photos
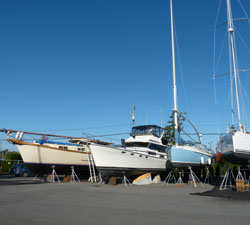
Photo 1: There are as many spring commissioning routines as there are types of boats. The smart approach is to know your own boat and develop a system that works for you.
Photo 2: Skookum Yacht Services crew at work at Vancouver’s Granville Island Boatyard. While your boat is out of the water, take the opportunity to check the condition of thru-hulls and other underwater fittings, as well as the condition of bottom paint.
Photo 3: This thru-hull shows the telltale reddish hue of bronze that has lost the zinc from the alloy, dangerously weakening the fitting. But this condition can be hard to see – this fitting was soda-blasted and the real colour revealed.
Photo 4: This thru-hull leaked from the hose above it. The handle turned and the valve felt like it was working, but the ball was not closing.
Photo 5: Corrosion reduces conductivity and increases resistance in electrical systems, affecting normal operation of components and causing potentially dangerous heat build-up. The terminal strip at left was corroded badly enough to short out the attached mast light wiring and blow the fuse. Corrosion inside a 12V DC negative terminal block (right) would eventually cause a fire; better ventilation of the locker where it was located might have prevented its deterioration.
Photo 6: Standing water in this rigging terminal will become stagnant and cause corrosion inside the terminal. The only remedy here is frequent rinsing.