Ask Andrew – Oil and Oil Changes
Apr 12, 2018
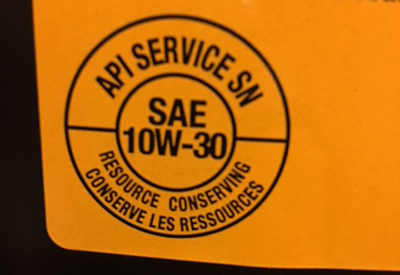
This is the API standard shown on oil containers. This oil is designed for Gasoline engines denoted with an S for Spark ignition engines. Diesel engines are denoted with a C for Compression ignition
All engines, including marine engines (inboards, outboards and stern drives) have many moving parts that need to be lubricated by oil in order to allow metal parts to move with as little friction as possible. Without oil, these moving parts would grind and seize.
Without quality clean oil, a number of problems could develop: The engine could have difficulty in starting; engine parts could become damaged by friction; rust buildup could occur inside the engine; dirt could build up and clog moving parts; the engine could overheat; the engine could lose compression, preventing it from running; the engine could burn excessive amounts of fuel. In short: a quality and clean oil is essential for proper engine operation, and ensuring that the right type of oil with the proper filter in place will add to the life of your engine.
The first time you walk the oil aisle in a marine or big-box store can be daunting. Lots of types, brands and numbers. What does it all mean, and how do you choose the right type for your engine? Here is a crash course:
Oils are classed in two ways:
1) SAE – The Society of Automotive Engineers – focuses on the viscosity of the oil.
Viscosity is a measurement of an oil’s ability (or inability) to flow. Thin, free-flowing oils have low numbers; thick, slow-moving oils have high numbers. Engines need to have an oil that flows freely enough when the engine is cold to start, but thick enough so that it fills the voids between moving parts, providing sufficient protection. This has to remain true when the temperature outside is -10 or +30 degrees! To this end, viscosity can be measured using one number or two: SAE 30, or SAE 10W30. The oil with two numbers indicates that it meets the SAE requirements of two or more SAE grades.
2) API – American Petroleum Institute – focuses on the type of oil – it’s characteristics and application. An API label is found on the oil’s label, with three parts: the application (diesel or gas, and the era the engine was built), the viscosity, and fuel-saving properties
 a page from a service manual detailing the grade of oil to be used, depending on the ambient temperatures of the area that the boat will be operating in
How do you know what type to get? Engine manufacturers specify the type of oil to use. This information can be found in the engine service manual, on the engine specification plate or sticker, or by contacting an authorized dealer.
Manufacturers specify the frequency of oil changes in their service manuals – the general rule of thumb, though, is 100 hours, or once per season (typically done just before haul-out, or just after launch – I recommend changing oil in the fall: this ensures that contaminants aren’t left in the engine all winter, and that the engine will be at its best form for re-starting in the spring).

Note the dipstick with the yellow handle in the lower left corner of the photo. The oil fill cap is on the right side, also yellow.
Engines typically have two access points for oil: The oil fill, and the oil dipstick. The oil fill is a cap which can be removed to add oil. The oil dipstick, when pulled from the oil sump, will show the quality/colour of the oil, as well as the oil level. The appropriate operating level should lie within the hash marks on the dipstick.
When the engine is started, the oil pump will force oil from the sump through an oil filter (which filters out particles and contaminants), and then through the passages of the engine, lubricating necessary parts. The oil then makes it’s way back to the sump where the cycle is repeated. Oil is under pressure when this happens – and many boats have a gauge at the helm to show the oil pressure. Too much pressure can indicate dirty, thick to too much oil in the system. Low oil pressure can indicate thin or not enough oil.

This oil looks clear, with little contamination – but note that the oil level is very high – well above the hash marks on the dipstick.
When checking the oil level with the dipstick, it is important to note the colour of the oil: it should be a honey-golden colour. Black oil indicates contaminants in the oil (which doesn’t run well through the engine potentially leaving deposits and contaminants in unwanted areas). Grey or white oil indicates water in the oil – which can cause many unwanted problems. Water can enter the system if the water level in the bilge is too high (entering into the sump at the bottom of the engine), or through a blown seal or gasket in the engine. In each of these cases – black or grey colour – the oil should be changed immediately, the engine run, and then checked to ensure that the oil is clear after running.

Note the oil colour – milky white/grey – indicating that there is water in the oil. The oil should be changed immediately and the cause determined.
Oil Changes the right way – step-by-step:
1) Ensure that there is oil in the engine, and that it is not a danger to run the engine to operating temperature in its current state.
2) Check the engine manual, or with an engine dealer to determine the correct oil grade, and oil filter for the engine (don’t trust that the oil filter currently on the engine is the right one!), and the correct amount of oil
3) Start the engine and run it to operating temperature – this warms the oil and allows it to run smoothly – and will allow you to extract it easily.
4) Unlike in a car, most marine engines don’t have a drain plug that is accessable to allow the oil to drain. Instead, oil must be pumped from the engine, using an extractor with a tube inserted into the dipstick tube. The extractor handle is pumped, building pressure, and sucking the oil up the dipstick tube into the extractor. Check the level in the extractor to ensure that the proper amount has been drained before finishing this step (ie if the engine is designed to hold 7L of oil, but you’ve only extracted 4, there is likely still oil inside).
5) Once all the oil has been removed, the oil filter can be removed and replaced. Most are spin-on type (to loosen, turn the filter to the left. To tighten, turn it to the right). You will likely need an oil filter wrench, as the continual heating and cooling of the filter can cause it to seize tightly to the engine. There are many mounting configurations – some are top-up, some are top-down, others are mounted to the side: All are equally messy. You may want to wear latex gloves, and wrap the end of the filter in paper towels – it’s also a good idea to wedge a container below the filter as it is removed, so that you don’t make a mess in your bilge.
6) Open the fresh oil container and using a finger, smear some fresh oil on the rubber gasket of the new filter – this will aid in keeping a seal, and in removal next time.
7) Spin on the new filter, and hand-tighten it (don’t overtighten, as the filter can be damaged, and will be difficult to remove the next time!)
8) Open the fill cap, and using a funnel, pour fresh oil into the engine. I tend to stop every 2L or so and check the level using the dipstick – this ensures that the engine isn’t overfilled – and allows the new oil to settle. Continue filling until the oil level is close to the full marks on the oil level dipstick.
9) Replace the cap, dipstick, clean up any excess oil, spills and rages. Run the engine for a few minutes and check the level and colour on the dipstick. Enjoy the remainder of the year, or 100 hours!
 : Andrew McDonald is the owner of Lakeside Marine Services – a boat repair/maintenance firm based in Toronto. Andrew has worked in the marine industry for 12 years and is a graduate of the Georgian College ‘Mechanical Techniques – Marine Engine Mechanic’ program.