See and Be Seen At Night
By Andy Adams
Navigation light repairs and replacements you can do yourself.
In researching this article, we spoke to a number of marine industry professionals and started by asking, “Have you ever noticed boats on the water at night with incorrect or missing lights?
“Or none at all!” was the frequent response we got as people laughed out loud about how common it is for navigation lights to be faulty.
It’s not a laughing matter though. This is a serious safety issue and one that is far too often ignored until the lights are needed.
It just makes sense at the beginning of the season to check them to make sure your navigation lights are in good condition and operating correctly.
Lenses seem to get hit and broken, severe wave impact can sometimes blow a lens out and the heat an incandescent bulb generates can cause it to blow if cold water gets in.
To get a knowledgeable professional’s perspective, we contacted Rob Davidson Program Coordinator for the Marine Engine Mechanics Program and Apprenticeship Training at Georgian College in Midland, Ontario who trains many new marine technicians every year. We asked Rob what generally causes the problems in navigation lighting.
He immediately answered that it is most commonly a wiring issue or that the bulb has blown. Wiring can come loose, water intrusion corrodes connections causing resistance, and a voltage drop that causes the circuit to fail …you get the idea.
Depending on the boat you have, in Canada, all but the smallest power and sailboats come equipped with Coast Guard approved and certified navigation lights, but these standard fixtures are generally of low interest to new boat buyers and the builders sometimes choose cost over quality. Ten years later, the OEM fixtures may fail.
Rob also pointed out that boats more than just a few years old probably have incandescent bulb lighting. He explained that the fixture was originally Coast Guard certified using a particular bulb for power, colour intensity and the required two-mile distance. You can’t just replace the bulb with any 12 volt bulb.
This is also true for the lenses, so although it makes sense to keep the OEM fixtures, that may not be the best answer. He also points out that you can now buy LED replacement bulbs but these may not fit the old fixture and they may not deliver the correct power, beam spread or colour. So, let’s assume you have at least some work to do to have reliable nav’ lights this season.
Luckily, a number of the OEM marine navigation lighting companies have been in the business a very long time and they may still have parts to repair your OEM lighting systems.
These could be [in alphabetical order]: Aquasignal.com, Attwoodmarine.com, Hellamarine.com, Perko.com, sea-dog.com and seasense.com.
 If you can’t repair the OEM fixtures, we suggest going with brand-new LED models. LEDs have a lot of advantages. They use about one tenth of the power, last far longer, may be “potted” in a totally waterproof epoxy. LEDs can be very shock-resistant but they are significantly more expensive to buy and you need ones with proper shielding to prevent electromagnetic interference, (EMI).
Light emitting diodes (LEDs) are not just a bulb, they often have circuitry built-in and some of that LED switching circuitry can generate electromagnetic interference that causes static on VHF radios and “hash” on fish finder displays. A “CE” mark on the LED indicates that it is shielded to attenuate EMI. Your marine chandlery can verify that.
If you decide to replace your lights yourself, the skill level required isn’t particularly high but this can be a ‘fiddly” job and you will need a number of tools to do the job properly.
You’re going to need a drill (cordless is handy), drill bits and a countersink, screwdrivers, wire cutters, wire strippers, a crimping tool, putty knife, heat gun, acetone, cleanup rags and rubber gloves as well as marine caulking and most importantly, you will need dielectric grease, marine crimp-on butt connectors and heat shrink tubing to make secure connections that don’t corrode or come loose.
We should point out that ABYC, the American Boat and Yacht Council who sets the marine construction standards, recommends that solder not be the sole means of fastening a terminal to wire. Crimping and soldering are quite acceptable but solder alone is not enough. A properly crimped and sealed connection will last a lifetime.
The reason is that by soldering marine wire causes the wire to become solid like the copper wire that is used in your house. The reason we do not use solid copper wire in a boat is because vibration will cause the wire to break. A soldered wire in a boat will eventually break creating an open circuit.
 So, with the parts and tools ready, figure out how the original fixture was mounted and remove it carefully pulling the positive and negative wires up and out through the hole to give you some wire to work with and secure them so they don’t slip back down the hole.
Inspect the old wire for corrosion, chafing or other damage and to be safe, replace it with new marine grade wire for the entire run if you can.
Use your putty knife rubber gloves, solvent and rags to scrape away and clean off any old sealing material on the mounting surface and remove any sharp edges that could scrape insulation off the wire.
It’s critically important to seal the wire connections against moisture and corrosion.
Next, strip the end of each wire, coating them with dielectric grease and then splice the pigtails of the LED lights to the power leads using the crimp-on butt connectors and heat shrink collars. Use your heat gun to seal it tight.
Mark the new mounting holes using the base of the light itself as a template, drill each hole being careful of what’s behind the mounting surface such as wires or cored areas of fiberglass if you are relocating the fixture. Do not drill into cored areas.
User your countersink to slightly bevel each hole to keep the gelcoat from cracking and prepare to install the fixture.
Most new LED navigation lights, are constructed as “potted” solid-state units that are completely waterproof, but you still need to make sure to keep water from seeping underneath and into the boat. Typically, you get a rubber or foam gasket for mounting and you may still need to bed the fixture with marine sealant. There’s usually some kind of chrome or stainless steel cap that completes the installation and you’re ready to see and be seen this summer on the water!
http://www.sea-dog.com/categories/lighting
Photo Captions:
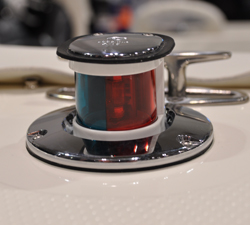
Photo 1: This clever bicolor running light pops up when needed, then retracts below deck level to ensure that lines and people’s feet don’t damage it during the day.
Photo 2: Lights in this grouping of 5 and 6 inch high Perko LEDs for big boats give up to a 5 nautical mile range.
Photo 3: The removable running lights are important feature on this Legend fishing boat. The tall poles give them highest night visibility and the 360 degree stern light provides some interior lighting as well.