Don’t Do It Yourself!
By Andy Adams
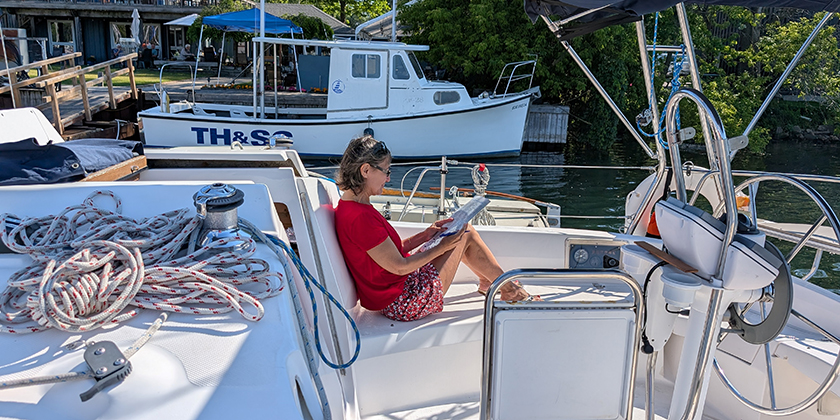
 It’s not just a matter of cost – there are simply lots of people who enjoy puttering around on their boats and doing their own mechanical work.
There are many useful tasks that an owners can do to keep their own little ship “shipshape”, however there are some things where we say, don’t do it yourself!
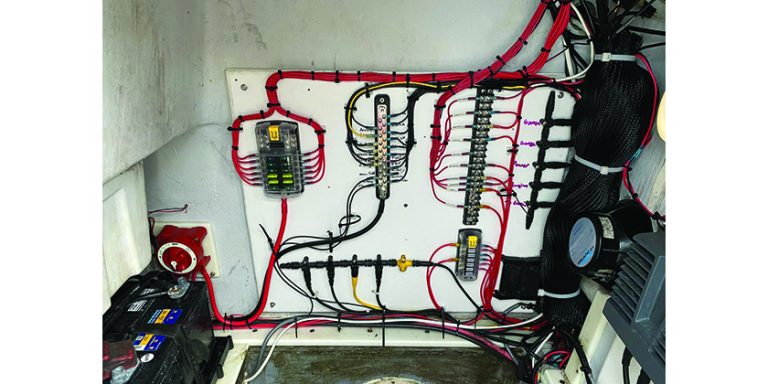
Generally, your fuel system is not a DIY item. For safety reasons alone, a boat’s electrical wiring and grounding systems should always be handled by a qualified marine technician. But, there are other areas where home handyman knowledge can get you into trouble.
Across North America, there are professional marine surveyors who are members of the Society of Accredited Marine Surveyors (SAMS) and the National Association of Marine Surveyors (NAMSGlobal) and/or who may also have accreditation from other associations. Professional marine surveyors are called in to inspect vessels prior to an insurance company providing coverage, to assess damage, by owners of boats preparing them for sale, and most importantly by potential buyers who wisely seek them to avoid problems.
For this article, we contacted Barry Goodyear from Ra Kon Marine Surveyors & Appraisers in Ontario. With a lifetime of experience in the business, Barry travels throughout North America surveying all types of boats and he has pretty much seen it all. Barry was willing to share a few choice examples with us for the sake of this article and for the benefit of our readers.
When an owner attempts to repair a problem, they may not realize that simply reconnecting the wire is only a small part of the required repair. I can just hear the owner going on about how expensive the dealer’s repair quote was to fix “…a couple of stupid wires”! However, that cost may have been because the drive had to be removed to do the job properly!
So, they did it themselves.
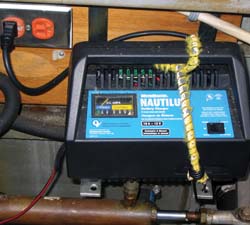
Photo 1 (above): In this photo, we have an electrical repair that was made in an engine room. In spite of the name, this Motomaster Nautilus battery charger is not designed for use onboard. The owner should have an approved marine-grade battery charger that will not cause a spark in the engine room and that is permanently installed. The charger needs to be wired directly into the breaker panel with its own dedicated breaker. This portable charger is plugged into a regular house-type wall outlet. The explosion danger is obvious, especially seeing the bungee cord mounting and solid core household wiring he has used. Topping it off, that is the steering ram directly below!
Barry offers an important tip: The installation instructions for real marine chargers often suggest mounting the charger as close as possible to the batteries. However, the charger is not to be installed directly over the battery bank, as the caustic gas that comes out during charging can corrode and damage even a proper marine charger.
 Photo 2: In this picture, you are looking at a locker where an owner has installed an air conditioning unit. The carpet seems like a bad idea, but the solid core wire should be multi strand Boat Cable and a twist-type wire connector should never be used on a boat for corrosion, spark and fire reasons. Next, the owner has connected two different sizes of wire and the power supply should be wired through a suitable dedicated breaker in the panel, not plugged straight into a shore power socket. Finally, when you close the locker door, you pinch the wire.
 Photo 3: Barry showed us a photo of a rudder made of stainless steel that was actually stained and pitted and this rudder that is bronze. Obviously stray current is damaging this bronze metal rudder severely. Somebody has a wiring problem! It could be this boat or one nearby.
While stray current causes electrolytic corrosion, there’s also galvanic corrosion that results from contact between dissimilar metals, for example, a stainless steel propeller on an aluminum drive where the protective factory paint job has been damaged. The exposed aluminum corrodes quickly.
The bronze rudder has what looks like beads or bumps that could be scraped off, but underneath, you’ll find a pinhole has developed which will eventually corrode right through to the other side. This is what electrolysis or stray current damage looks like.
 Photo 4: This next picture is very subtle; it is a Dynaplate from Guest Marine – a $250 protective anode. Once it’s painted, the anode’s ability to properly ground is lost. So, the grounding plate is now garbage and some other part of the boat may be corroding. Notice that it says right on the anode “Do not paint”. Grounding plates and anodes are never to be painted as they will no longer function properly.
 Photo 5: Here we see a holding tank that is not properly secured, has older hoses with smears of caulking where somebody has obviously tried to fix a problem with odours. The black hose in the back has little white dots on it. Those are crystals of urine. It’s very important to use the right type of non-permeable sanitation hoses if you want a fresh-smelling boat.
You may also note the grey plastic hardware store nipple connectors. Remember that all throughhull fittings should be marine quality bronze, or Merelon, a special marine plastic material.
 Photo 6: Here we have good news and bad news. The good news is that the hoses are properly double clamped and the large Trident hose is the correct type and quality. The black and gray hose above it is not. Also, this is leading to a canister designed to trap odours. It should be inclined upwards. If liquid were to get into the canister, it could freeze and break and would also not function properly in the summer.
 Photo 7: We see more than a few concerns here; this owner has installed a throughhull. It should be a bronze fitting with a valve and hose attached to it but instead, a non-marine connector has been pushed up through the hull, a short hose has been used to connect to an elbow which then goes through a gate valve instead of a marine quality quarter turn ball valve. Finally, it’s leading to a non-reinforced hose.
Okay–let’s get out of the engine room. How about we just install something new on the foredeck?
 Photo 8: This owner has installed a new deck hawse. He’s done a nice neat job of cutting the hole, but he’s gone right through the balsa core and didn’t reseal it. The core is getting wet and will rot. The wet rope leading into the anchor locker will ensure that it gets wet. Also the screws have not been properly caulked. It’s essential that there’s a generous amount of proper marine grade caulking from a company like 3M or Sikaflex. A tub of silicon bathtub caulking is just inviting trouble.
Fuel systems, wiring issues and critical things like throughhulls all have to be handled by a trained professional. Failure of a throughhull is the number one cause of sinking. Also, because boats often have been constructed using a core material, what might look like a simple matter of drilling a hole, could turn out to be the beginning of saturated coring material and a structural disaster.
We encourage you to enjoy working on your boat, just remember when it comes to safety and critical systems, we suggest you don’t do it yourself! Contact a professionally trained marine technician to undertake your repairs. Your surveyor should inspect/grade your vessel using standards such as A.B.Y.C.
FAST FACTS
National Association of Marine Surveyors www.namsglobal.org
Ra Kon Marine Surveyors & Appraisers www.rakon.ca
Society of Accredited Marine Surveyors www.marinesurvey.org