Confident Sailor – Reluctant Sailor – Part 3
By: Rob MacLeod
Before leaving on an extended cruise, it is critical to inspect and maintain all systems on your boat. Some of this work can be completed before launch if you are in an area where the boat is hauled for the winter. Leave sufficient time between a major repair and starting your cruise to ensure there are no issues with the work that is done.
This past spring, I reviewed the most frequent repairs and maintenance items I made in the prior season, and in no particular order, they are:
* Battery charging systems
* Engine cooling systems
* Refrigeration
* Food storage and provisioning
* Head including diverter (Y) valve and overboard discharge
Battery Charging Systems
There are four major battery charging systems available to cruising boaters – shore power / charger, alternator, solar, and wind. We have chosen not to include wind power generation on Sojourn, but the cruising sailors we talk with swear by their wind generators (when they are not swearing at them).
Our coastal cruising rhythm is three or four nights at anchor or on a mooring ball and at least one night a week on a dock. Your cruising choices will dictate your energy management needs and the selection of charging system and capacity will vary accordingly. One night per week at dock gives us a number of things, but in the energy department, it gives us consistent power to re-charge all of our systems.
We currently have two 95-AH deep cycle house batteries and a starting battery. The charging systems go through the house batteries and then through an automatic charging relay (ACR), which ensures the house batteries get charged first and then the starting battery is topped up. All three batteries can be combined if we need additional starting energy. It took a while to get the battery charger to actually send its rated ten amps to charge my batteries, and now that it does, both Sojourn and I are happy. An investment in a clamp meter that allowed a quick reading of the amperage being put out by the charger allowed me to pinpoint the issue and make the correction.
A few years ago, in anticipation of going south, I researched and installed a high performance 100-amp alternator and external regulator on our Westerbeke 30 HP diesel engine. This summer I replaced it with the original 60-amp alternator. Why? Experts I have talked with told me that smaller engines are not set up for high output chargers. High output alternators require either a serpentine or double pulley to handle the stress on the belts and pulleys. The company I purchased the alternator from had a number of adaptors for serpentine and double belt pulleys – but not for my engine.
Our third source of energy for recharging is solar. On sunny days, we have more than enough power generation to keep the refrigerator and 12-volt freezer doing their jobs and the batteries topped up. We turn off the refrigeration at night to conserve energy and the insulated box seems to stay in a reasonable temperature zone until morning.


Refrigeration
I don’t feel that my boat was originally designed for long term cruising. Nor were many mid-80’s production boats. I have talked with other owners of the CS36 traditional and have heard what they have gone through to improve the cooling and insulation in their ‘ice boxes.’ We replaced our refrigeration unit in 2009 before heading to the Bahamas and installed cold plates, at the recommendation of a knowledgeable friend, and the system worked flawlessly for the first three years.
We then started having intermittent issues. The refrigeration unit would put out well for two or three days and then it would go down. I found some of the wire terminals were loose. I replaced them with a terminal bar. The unit worked for a while and then a new problem; I could hear the compressor start up and then almost immediately shut down.
Fortunately, the maker of our cold plates (no longer in business) used a Danfoss 50 compressor and Danfoss has excellent online support. Their UK distributor put together a series of trouble shooting videosand, while working through those videos, I discovered what looked like a very thin string dangling from the compressor control unit.
On further investigation (I stripped back the plastic) I discovered the string was actually a wire – a very thin wire. Snooping around behind the compressor, I found the other half of the wire. Bearing the ends of both wires and connecting them with a trouble shooting wire I had with alligator clips at both ends, the refrigeration unit sprang to life.
The fan signal wire had been installed across the top of the compressor and the vibrations of the compressor wore the sheathing off the wire and it began to short out (intermittent failure) until the wire broke (complete failure). I added in a section of wire to get us through this summer and will replace the signal wire during spring commissioning.
 Food storage
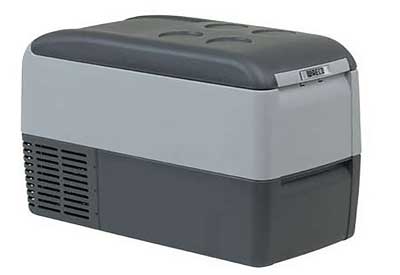
An addition to our galley is a Waeco 12-volt fridge/freezer that kept our frozen food frozen for the entire three weeks of our most recent cruise. In the past, meal planning was primarily cooking what had thawed. By deep-freezing our meat prior to departure, we could select what we wanted to eat. We were able to stock three full weeks of protein for two people – a great benefit in not having to re-stock provisions when you really want to be at anchor.
Engine Cooling
Keep in mind that a boat is a system made up of a series of subsystems – propulsion (sail and engine), electrical, plumbing, etc. I have had challenges with my boat’s engine cooling system since day one.
During the cruise south, the alternator belt broke and we did not catch it right away. The engine overheated and we had to sail to the anchorage. While replacing the alternator belt, I pulled off the raw water pump to check the impeller and found one tip missing.

At this point, let me introduce you to two of my most favourite tools: A long handled haemostat and a hose hook – both purchased at my friendly neighbourhood auto supply store.
When I spotted the errant impeller tip in the output side of the pump, I was able to latch on to it with the haemostat and draw it out. Yes, I could have used a pair of needle nosed pliers, but the locking mechanism allowed me to hold onto the piece of rubber without continuing to exert pressure. The haemostat also comes in handy when you have to retrieve a nut, washer, screw, or other small item you may drop into the engine sump or some other restricted space.

The second tool is a hose hook, intended to loosen the grip of hoses that have been attached to some part of your boat for the past few decades. Able to get under the edge, break the seal of the hose, and then give you leverage to pull the hose off the fitting, I think the hose hook is invaluable. It is also great for fishing for impeller bits in a water pump. When I blew air through the output fitting of the pump I felt a restriction, so I continued to search for and remove several impeller bits – eight in fact – all wedged into the narrow elbow fitting feeding cooling water to the heat exchanger. Once the pump was re-installed, the operating temperature of Sojourn at 1500 RPM returned to a civilized 180F. At the same time, I replaced the thermostat – always advisable anytime the engine is overheated. Be sure to carry all of these items in your spare parts kit.
Head Including Diverter (Y) Valve
Nothing dampens the enjoyment of a trip faster than a malfunctioning or stinky head (toilet). On older boats, much of the smell comes from older hoses connecting the head to holding tanks and to pump-out fittings. Hoses, especially those which are low lying and allow effluent to pool, may start smelling in as little as five years. Replacing all of the hoses in an older boat then becomes an ‘at least once each decade’ maintenance task.
If your cruising will take you out of coastal waters (more than three NM) you will also need to consider the ability to discharge black water waste (untreated sewage) directly overboard – either directly from the head or by pumping the holding tank. The regulations governing the use of overboard discharge are strict – and for good reason. Many harbours, which used to allow overboard discharge, have become NDZ (No Discharge Zones). In these areas, Y or diverter valves have to be secured in the closed position so they cannot be used. Authorities can and will inspect any such installations and the fines can be significant.
We were also having problems getting raw water into the head. We had installed a Lavac(r) vacuum head prior to our 2009 trip to the Bahamas. Taking out the medicine cabinet, I was able to determine the vented loop was functioning well, but the input line had to be re-primed each time we flushed the head. By adding a check (or one-way) valve before the anti-siphon valve, we kept water in the supply side but still guarded against siphoning water through the head.
Conclusion
You don’t have to be a mechanic to keep these systems in top form. By knowing how to maintain them, you will be able to give better information to any marine professional you have to call on when the time comes.
See you along the way,
Rob MacLeod
Photo Credit – Mary MacLeod
