Keeping a good boat in good repair Part 2
Jan 23, 2020
In part two of the series, we follow Graham’s repairs to Pitoraq’s rudder.
“Align and fit the housings”
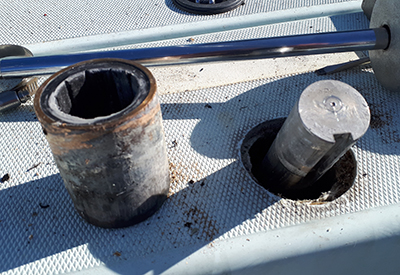
With old boats every repair seems to uncover something else needing attention. Removing the top rudder bearing and enlarging the opening for the new bearing revealed an area of wet balsa core.
Wet balsa core around opening for new bearing
I cut back the top layer of the deck to where the core was sound and dry, plus a bit to make the cut-out symmetrical.

Next, I started the fiberglass repair to the deck and did the rough alignment for the top rudder bearing. For the initial alignment I used a piece of steel tubing clamped to the skeg.

cut back the top layer of the deck to where the core was sound and dry
The top bearing looks properly positioned and ready to be glassed in.

But first the bottom bearing needs to be fit in the hull penetration.
Below: steel tubing clamped to the skeg
Right: The top bearing
The bottom bearing needed to be mounted on the inside of the hull, it could not go through the hull like the top bearing went through the deck because the skeg is directly underneath. The problem is that the hull is neither flat nor square to the rudder shaft. To fix that, I started by making a router template matching the outer diameter of the bearing.
I then positioned it square to the axis of the shaft using shims and glued it down using a hot melt glue gun. I used a router to machine a flat recess for the lower rudder bearing.
Pretty happy with the result, The bearing sits flat and snug in a recess that will support side loads.
Next step is to put the rudder in place and bond the bearings into the hull and deck.
In preparation for permanently fixing the rudder bearings into the hull and deck, I put the rudder in place with the bearings on the stock and shimmed and clamped the rudder to hold it in alignment.
With everything in place, starting with the lower bearing, I bonded the bearing housings with fillets of filled epoxy. I then built up around them with layers of fiberglass and West System epoxy.
In conjunction with the top bearing installation I also built up the bottom layer of the deck where the soaked core was removed. The next step will be to remove the rudder again and do the repairs to it at home while the deck refinishing continues on site.
Next issue we will take a look at the tent that Graham constructed so that he could work on the boat throughout the winter.