Ask Andrew: Replacing and Installing Transducers
May 13, 2021
– the existing transducer
A Transducer is a device that is installed below the waterline that provides underwater data to a display at the helm. This data is usually in the form of depth and speed – but in more advanced systems can also provide sonar, fish-finding and side or forward views.
An installation, upgrade or replacement can trigger the need to make an install – but I’ve noted that a replacement (especially to a larger or more sophisticated unit) tends to be the most daunting.
 using a reciprocating saw to remove the existing sleeve
Recently, I worked with a client who was upgrading to a new system on a 1980’s era Catalina, and was replacing a transducer with a 2” diameter through-hull to a 3” diameter through-hull. To compound the problem, the transducer had been leaking (very lightly) throughout the 2020 season. So, the job involved removing the existing 2” transducer, cleaning up the mounting location and determining the cause of the leak (and repairing, as necessary), enlarging the hole to accommodate the new 3” diameter transducer, and installing it.

a view from inside the boat of the existing transducer
The existing transducer was a removable type – the data sending unit could be removed (and replaced with a plug), with a sleeve being the permanently installed portion. Access from inside the boat was cramped and restricted, and none of the existing components were going to be replaced. In this case, in the interest of ease and time, I removed the through-hull sleeve by cutting in with a reciprocating saw and using a mallet to slide it out.
Next, I cleaned the area: removing sealants, dirt, grime and excess material to allow the surface to be fresh and ideal for installing the new unit.
Because the diameter of the new transducer was larger than the original, the mounting hole had to be enlarged. I used a hole-saw to create a 3” diameter template out of white oak. I transferred the dimensions onto the hull, and used a Dremmel tool to cut out to the correct size. I checked the fit a number of times as the hole was being enlarged to ensure that just enough material was removed to accommodate the new unit.
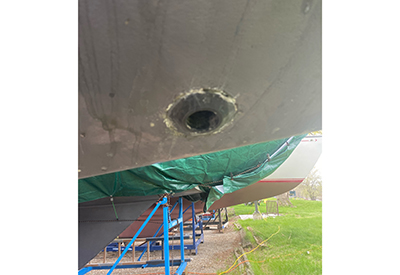
 the original transducer removed
A dry fit is very important. Before using any sealants or making a mess, I fit the unit, and ensure that the backing plate was the correct thickness, and that the tightening nut fits and tightens appropriately. Finally, the orientation is important (which side faces the bow, or points to the keel) and can affect proper operation.

enlarging the through-hill hole to accommodate the new, wider transducer
During the dry-fit, I applied tape to the outside of the hull, so that any sealant the is squeezed out while mounting the transducer won’t make a mess. The ideal finished product will be water-tight, sealed, and will have clean lines.
Application of sealant comes next – and it’s main purpose is to ensure that the tightened transducer will be water-tight. To that end, the right sealant should be chosen (a sealant designed for below-the-waterline applications), and applying it in the right quantity in the right location. I used 3M 5200, and applied a generous bead of sealant around the inner lip of the transducer, and fitted it into the mounting hole. I confirmed the orientation, and ensured that the tape guide was placed currently. I then moved inside the boat, and completed the work from there.
More sealant was added to the area between the threads and the mounting hole, filling any gaps. I applied a layer of sealant along the underside of the white oak backing plate, and fitted it, screwing on the tightening nut. I did not apply any sealant to the threads of the transducer.
I tightened the nut by hand as far as I could, and then used channel-lock pliers to tighten it. As I was tightening, I ensured that the transducer stayed straight, that threads were lined up correctly, and that sealant was squeezing out of the tightened areas (indicating that the sealant is filling the area, and able to do its job).
 a guide for the new hole, which wil also serve as a new backing plate for the new transducer
I used a dry cloth to clean of excess sealant. Its easier to use products like acetone to clean away excess, but I shy away from solvents near transducers and plastic, for fear of causing damage. I returned to the outside of the boat at this point, and checked to make sure that the sealant had squeezed out well. I removed the tape and cleaned up the lines.
The owner asked to run the wires and make connections to the multi-function display on his own – so my portion of the job ended here.
 the final result
Removal, installation and re-sealing can be daunting, especially some of the unknowns of what may be lurking beneath a tightening nut or a backing plate. The great news: most of the issues associated with through-hulls and transducers can be fixed in a straightforward way. But, if you’re unsure or nervous, contact a marine tech to consult or complete the work on your behalf.
 Andrew McDonald is the owner of Lakeside Marine Services – a boat repair/maintenance firm based in Toronto. Andrew has worked in the marine industry for 12 years and is a graduate of the Georgian College ‘Mechanical Techniques – Marine Engine Mechanic’ program.