Ask Andrew: Connections at the battery
Jan 13, 2022
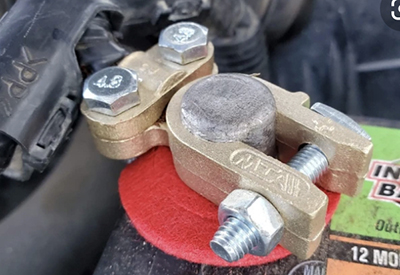
a clamp style connector on a battery post
Rarely have I seen a boat that is bought brand new and continues to look like it rolled off the factory floor a year or two later. Upgrades and changes are inevitable. A new GPS is installed. A cooler is replaced. Lights are swapped out. The list goes on.
In my experience, there is nowhere that the gradual customization of a boat is more evident than at the battery. The battery connections on a 20 year old boat are something to behold: Held together with electrical tape, green with corrosion, mangled ring terminals barely held in place with a loose wing nut.
There are rights and wrongs for safe and quality battery connections (see Boat Nerd series beginning this week for DC understanding!) – and there are practical reasons for each. Here’s a simplified breakdown:
3 rules for battery connections
1) The right connector
Wiring is designed to connect to a battery via either the battery post (a solid metal post, to which a clamp connection is tightened, a threaded post (1/4’, 5/16” or 3/8”) utilizing a nut to secure ring terminals in place, or bolts that tighten over ring terminals.
There are two ways to select the right size of connector:
a) Determine the size of the battery post and select the appropriately sized wire termination (clamp connection or ring terminal).
b) Determine the size of the wire that will be connected to the battery
c) Choose the correct ring terminal, matching both the battery post diameter and the wire size
 this set-up utilizes nuts tightened over ring terminals. Note the correct terminal stacking, but the lack of shrink-tubing
2) The right connection – terminal stacking and nut type, wire crimping and shielding, torque spec
Four conditions will determine that the connection has been done correctly
a. Correct wire crimping – completing a correct wire crimp involves striping back the wire’s shielding sufficiently to insert into the chosen ring terminal. The ring terminal is crimped using an appropriately sized tool, with enough pressure to completely compress the ring against the wire. A pull test should be performed after crimping to ensure that the connection is strong. ABYC produces a standard under E-11 (table XV) – Tensile Test Values for Connections – which provides qualitative values for connections
b. Shielding the connection from exposure to moisture and oxidation. A quality connection will have shrink-tubing installed over the ring-terminal base and exposed wire. The shrink-tubing should not extend over the ring. Ensure that the tubing is of the correct size so that once heated, it provides a tight fit.
c. Terminal stacking. A battery post typically has multiple connections with different sized and style ring terminals. The ring which carries the largest load (typically to the engine’s starter battery) should be on the bottom (directly against the battery) so that the greatest surface area of the ring is touching the greatest surface area of the battery post. Above this ring, the other terminals should be stacked in order of the largest to smallest diameter (with the smallest outer diameter on the top. There’s a catch-22 here: the ring with the smallest outer diameter may be small, thin and malleable. A nut will be tightened over it and torqued in place, which could mangle this fragile upper ring. I suggest adjusting the stacking order to try to limit any damage to fragile ring terminals
d. Using the correct style of nut, and torquing it in place. A standard nut should be used to secure the ring terminals. A wing nut, or a lock-nut should not be used. A standard nut provides good surface area to secure the rings, and can be torqued tightly with a measurable strength (the standard is 100 lb-in)
3) The right number of connections
 this set up appears clean and neat with great labelling – but the terminals aren’t stacked appropriately
A maximum of four. I’ve seen up to ten, and the nut barely fits on the post. If more than four connections are needed, the lower current-carrying wires should be separated and secured to a bus bar, mounted as close as practicable to the battery, with a single wire running from the bus bar to the battery post.
Stick to these three rules and your battery connections will be safe, secure and reliable.
Why do we do this? what advantage comes from following these rules, and what are the consequences if they’re ignored? There are a few:
i) Good conductivity between the battery posts and the ring terminals (through proper stacking and torquing the nuts to spec) will prevent voltage drop between the battery and the load. This is particularly important for heavy draws (like the engine’s starter motor), and for sensitive electronics (multi-function displays and chartplotters)
ii) Corrosion will be mitigated through the use of shrink-tubing, proper terminal stacking, using the correct size of ring terminals, and using bus bars to limit the number of conductors on each battery post. This will lessen that change of voltage drop
iii) Preventing sparks and electrical arcing will be achieved by utilizing the correct size of ring terminals, crimping proper connections, and torquing battery nuts to spec.
A final note on battery safety from another perspective (but highly related): batteries should be secured using trays or boxes, and secured appropriately with straps. This will prevent the batteries from shifting, spilling, or becoming damaged while underway.
If the battery is within a covered box, the box should be ventilated to allow gases to escape. If a tray or other method of securing the battery is used, the positive and negative posts should have rubber boots completely covering the posts and all ring terminals. These boots prevent the positive and negative posts from coming into contact with each other, or other metallic parts of the boat (imagine what might happen if a wrench is dropped onto the battery and it comes in contact with both battery posts at the same time!).
Battery safety is closely linked with battery function and longevity. I encourage you to take some time between now and spring launch to review your battery set-up and make any adjustments necessary to keep your boat ship-shape.
 Andrew McDonald is the owner of Lakeside Marine Services – a boat repair/maintenance firm based in Toronto. Andrew has worked in the marine industry for 12 years and is a graduate of the Georgian College ‘Mechanical Techniques – Marine Engine Mechanic’ program.

