Ask Andrew: Anchoring – you asked!
July 25, 2019
A reader suggested we take a look at anchors. Anchoring seems simple enough. A weighted hook with a line attached is dropped into the water. When the hook hits the bottom, the line is tied to a cleat, and the proud sailor signals the helm that the vessel is secure.
By definition, this is true. However, there are a few more complexities – especially with respect to design and function – but also in technique, that every boater should familiarize themselves with.
Transport Canada sets regulations that specify the requirements to have anchors onboard pleasure craft
Vessels up to 9m (29’6”) in length require at least 15 m (49’3”) of cable, rope or chain in any combination (including Personal Water Craft (PWC’s)
Vessels from 9m – 12m (29’6” – 39’4”) in length require at least 30 m (98’5”) of cable, rope or chain in any combination
Vessels from 12m (39’4”) – 24m (78’9”) in length require at least 50 m (164’1”) of cable, rope or chain in any combination
There is no requirement for human powered vessels (canoes. Kayaks) and paddle-boats and sailboards to have an anchor aboard.
Note: when at anchor, Transport Canada requires that lights, day-shapes and sound signals are used in various circumstances to allow other boater to know and be aware that your vessel is at anchor (both to know that your vessel is stationary, but also to avoid your anchor rode, which may be some distance from the boat itself).
An anchor is considered to be a safety device by Transport Canada, which is why it is required aboard. It’s used as a safety device in a variety of ways:
a) If propulsion or steering (engine or sails) are lost, damaged, or inoperable, an anchor can allow the vessel can be kept in one location while the problem is sorted out
b) In a storm, dense fog, or rough conditions, it may be safer to stay in one location, than to move
c) To allow rest for the crew – anchoring will allow crewmembers the opportunity to sleep without making way through the water
A few other reasons boaters may choose to anchor (beyond mere safety):
1) To enjoy the day – swimming, BBQ-ing or fishing are on the agenda, and staying in one spot is ideal
2) To spend the night ‘on the hook’ – rather than docking at a marina or yacht club, you may choose to anchor in open water to enjoy an evening’s rest
3) When it’s too shallow to dock ashore, you may choose to anchor offshore, and use a dinghy to move between the boat and shore
When/where not to anchor – charts will indicate areas where anchoring is prohibited (typically in busy harbours, on ferry routes and shipping lanes).
Beyond the ‘prohibited’, also the ‘practical’ – avoid anchoring in areas with heavy traffic (as a courtesy), and set up the anchor and rode so that ‘swinging’ wont interfere with other boats, shallow water, buoys/markers or heavy traffic.
Method – how to anchor
 four common anchors: 1) fisherman 2) Danforth 3) CQR/plough 4) grapnel
Step One: Use the right type of anchor for your application. There are a number of types of anchors available, each with different properties, designed for different types of sea beds:
Fisherman: The traditional design – and holds well in all bottoms (holding 7-10 times it’s own weight), however its own weight is often the negative factor in carrying aboard modern boats
Danforth/Fluke: The danforth or fluke anchor uses a stock at the crown to which two large flat triangular flukes are attached. The stock is hinged so the flukes can orient toward the bottom (on some designs they may be adjusted for an optimal angle, depending on the type of bed). The fluke anchor has difficulty penetrating kelp and weed-covered bottoms, as well as rocky and particularly hard sand or clay bottoms
CQR/Plough: Plough anchors are popular with cruising sailors and other private boaters. They generally work well in all bottoms, but are not exceptional in any of them
Mushroom: ideal for silt or fine sand. It is shaped like an inverted mushroom, the head becoming buried in the silt. Mushroom anchors work great at holding boats in place on muddy bottoms but not all that well on rocky or sandy bottoms.
Grapnel: a traditional design for small boats. The grapnel is simply a shank with four or more tines. It has a benefit in that no matter how it reaches the bottom, one or more tines will be positioned to set. In coral it can often set quickly by hooking into the structure, but may be more difficult to retrieve
Having the right anchor and cable for your boat is important. If you don’t, rough winds and water can cause it to drag, leaving your boat to drift. This is especially dangerous if you are asleep or swimming nearby. Make sure that your boat is well anchored and that the swivel is properly locked, and keep watch to detect signs of dragging
Step two: Plan to lower the anchor from the bow. Many modern boats have an anchor roller (a built in device at the bow, specifically for storing and manoevering the awkward and heavy anchor), and modern electrical systems allow electric windlasses and foot pedals to control the movement of the anchor up and down). In certain conditions, it may be advisable to anchor at both bow and stern (using two anchors) – never anchor from the stern alone, as this could case the boat to swamp or capsize.
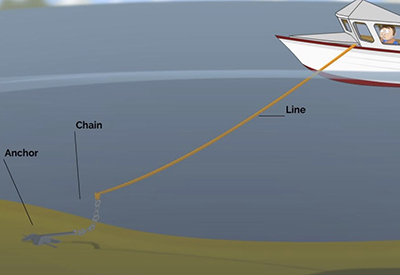
 How much cable should be veered? the scope based on the type and combination of anchor rode used
Step three: Determine the water depth (using a chart, tide tables, and/or depth sounder, conditions, and swing room to calculate the amount of rode to put out (Quick tip: If you’re in the habit of anchoring, its nice to put markings on the rode at common intervals – say every 10 feet – so that the amount of rode put out is easy to determine). Lay the amount of rode you plan to use, on deck
A vertical line from the boat to the anchor, won’t allow the anchor to dig in. A horizontal line will allow the anchor to dig in hard (but isn’t practicable), so a 7:1 ratio is used, and this is called ‘scope’. Ie. The rode let out should be 7 times the depth of the seabed
Step four: cleat the anchor rode at the depth you want it to stop, allowing for sufficient scope (if you don’t, you could lose the anchor and rode completely!
Step five: lower the anchor, until it rests on sea-bottom, then slowly back off until the rode is let out with sufficient scope, and the anchor is set. If the anchor doesn’t set, re-position and try again
Step six: note vessels, land, and landmarks nearby and set an anchor watch – the vessel’s position and anchor hold should be checked regularly (even overnight) to ensure that the vessel doesn’t accidently drift!
Step seven: conserve your power. As you’ve been motoring, you’re likely using your starter battery in order to start and run the engine to set the anchor. Now that you’re anchored and the engines are off, use the boat’s battery selector switch to use the house batteries (saving the starter battery from draining). Be conscious of your power consumption at anchor, and use engine alternator, or onboard generators to power the batteries.
If you find this article helpful, I’d love to hear back from you. If readers have interest, Id be happy to include similar how-to articles on mooring, docking and other boater skills.
 Andrew McDonald is the owner of Lakeside Marine Services – a boat repair/maintenance firm based in Toronto. Andrew has worked in the marine industry for 12 years and is a graduate of the Georgian College ‘Mechanical Techniques – Marine Engine Mechanic’ program.