Applying or Repairing Your Vinyl Boat Lettering
One of the pleasures of boating, at least for me, is reading boat names! I enjoy the many humorous names and those that are a play on words. In many cases, they certainly provide a glimpse into the owner’s personality. Or, as in my case, Aquaholic, my addiction to all things related to water sports and activities.
May 24, 2023
by Marc Robic
One of the pleasures of boating, at least for me, is reading boat names! I enjoy the many humorous names and those that are a play on words. In many cases, they certainly provide a glimpse into the owner’s personality. Or, as in my case, Aquaholic, my addiction to all things related to water sports and activities.
Something I often notice is the size of the lettering. Some are so small, it would be hard to read the name from 50 yards away or more. So, hailing or identifying the boat becomes challenging. I remember reading many years ago that the best minimum letter size (height) is 4 inches, making it readable for a good distance.
The nice thing about applying your boat name is that it is very easy to do and does not require any special skills or tools. Plus, finding a vinyl sign maker near you is super easy. Yes, you can also order online. But if you can, support your local sign maker. Most will have outdoor UV resistance vinyl material in a huge choice of colours. You can also have fun playing with the letter size, font design and colour, as sign makers offer a vast selection and, in most cases, can do custom changes.
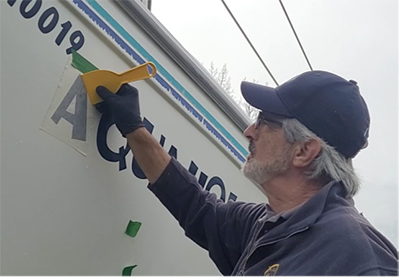
One piece of advice I can share, is to order extra so you can make repairs without having to order from scratch. This is what prompted the idea for this article and YouTube video. I had one letter that was damaged on the port side. Thankfully, when I initially ordered my signage, I added two extra ones of each size. I have a smaller size on the stern.
So, I was able to easily replace the damaged letter.
Here is the step-by-step process and list of what you will need. I also created a YouTube video
Getting started
To install your vinyl lettering, you will need the following items:
• Acetone
• 50% rubbing alcohol / water solution
• A plastic spatula
• Soapy water (Joy or Dawn are best in my book) or Windex
• Lint free paper towels
If you are removing existing lettering to change the name or for a repair, you will also need:
• Large masking tape
• Hairdryer or heat gun
• Scraper or straight edge type razor blade
If you are adding a new name on a blank area, skip to Step 4.


Step 1: If replacing or removing only a section, apply the large masking tape in a way that it will deflect the heat from the hair drying away from the adjacent letters.
Step 2: Using the hairdryer and straight edge razor blade, heat up the surface and slowly scrape or peel away the vinyl.

Once removed, you will be left with the residual adhesive from the vinyl.

Step 3: Using a little acetone and a lint free towel, wipe away the residual adhesive being extra careful not to touch the adjacent letters.
Step 4: Once the residual glue is gone, clean the surface with the alcohol solution to clean the area as well as neutralize the acetone.

Step 5: Set the boat name or letter in place using a piece of masking tape on both ends. Take time to step away and see how it looks from a distance and adjust until you like it. Now keep the sign or letter in place with a long piece of masking tape along the top edge to act as a hinge. Then, flip the sign or letter up.

Step 6: Apply soapy water or Windex and, using a rolling motion, slowly roll down, removing the backing paper at the same time until the sign or letter is in place.

Step 7: Using the plastic spatula, squeegee the excess soapy water or Windex out, taking care to squeeze out any air pockets. Once in place, peel away the top protective paper pulling straight down slowly so as not to pull the letter(s) off. Gently wipe the area dry and you’re done!
IMPORTANT: do not touch, wipe, wash or apply wax for at least 2 or 3 days. Wax will coat the letter and prevent the adhesive from curing properly.
Job completed in less than 30 minutes.

Now my next job, as you can see from the images, will be to replace the vinyl stripes along the hull, below the gunwales… A longer job time wise, but it is the same process.
 Marc Robic
mrobic@aol.com
INFORMATION about the writer:
Marc is a member of the Canadian Power & Sail Squadron. He and his wife sail their Catalina 270, Aquaholic 3, out of the Ile-Perrot Yacht Club in Montreal, where Marc spent 16 years as Harbour Master. They are regular Caribbean bareboat yacht charterers. With over 40-years experience, Marc is also an avid onboard do-it-yourselfer.