Maintenance with Marc: Your engine mounts – do they need replacing? Part 2

Oct 13, 2022
by Marc Robic
Part 1 was published in our September 22 2022 edition.
This picture shows all the tools needed to complete the engine mount replacement.
Once you’ve removed everything around and opened up all accesses to the engine and prop shaft, use wood blocks under the engine to hold it in place. I used the car scissor action jack from my car. You’re not looking to raise the engine. You just want to apply enough pressure to hold the engine in place, should something go wrong. But since I replaced one mount at a time, the jack was simply an overabundance of caution.
You now need to remove the nuts and bolts holding the transmission output flange to the propeller shaft flange.
As best as you can, measure and note the current distance between the mounting base and the top or bottom of the mounting plate on the engine. In the example pictured, the starboard rear mount is 2.75” from the support base to the top of the mounting plate. Do this for each individual mount, as they may seem the same, but many times they are not, as I learned on my engine, where the front port side mounting flange was larger and higher as it also held the alternator.
These measurements will only serve as a benchmark or starting setting, as over the years, the chances are good that the original mount rubber inserts have compressed, as opposed to the new ones. This is why the last steps will involve aligning the engine to the propeller shaft. Engine mount rubber compression is also the reason why checking the alignment with a feeler gauge is recommended as a regular maintenance check, based on your engine hours. I check mine every three years. With the new ones, I will check again in the spring.

(Right) new engine mount installed
Now, one by one, remove and replace each engine mount. Using the measurements you took, set the height of the engine mounting plate to the base of each engine mount.

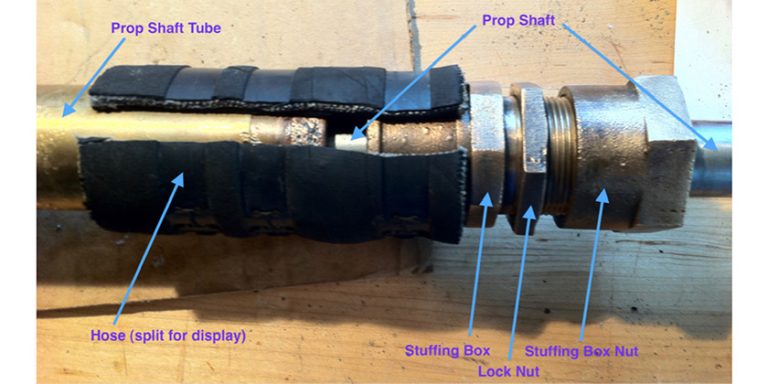
(Left) Checking the prop shaft alignment
Once each one has been replaced, it’s now time to align the engine to the prop shaft. To do so, use a sparkplug feeler gauge and check the “fit and feel” on top, sides and bottom between the transmission output flange and the prop shaft flange. If, for example, it is more open on the bottom, the front of the engine needs to come down. Now rotate the prop shaft and check again. Do this a few times, as it will confirm the shaft is sitting properly centered in the prop shaft tunnel. If any adjustments are needed, do these slowly in only quarter to half turn increments at a time. Recheck the alignment with the feeler gauge and repeat until the alignment is perfect. Remember to lower or raise the engine equally on each side (port and starboard) for each adjustment.
Once you’re satisfied with it, properly tighten each engine mount and re-attach the transmission and prop shaft together. Double check everything has been properly tightened.
Testing
Start the engine. From the engine compartment, keep the RPMs at idle to see how the engine is responding. Increase and decrease the RPMs. Now, switch into forward gear and see how the shaft and engine are running. Is the shaft rotating and the engine running smoothly with no vibration? If not, stop and do the alignment step again. Increase the RPM and observe the same. Now go into reverse gear, idle and at higher RPMs. Observe the engine mounts too!
If you’re a hand’s on do-it-yourselfer with basic tools on hand, you can do this. But some boats require acrobatic skills such as an engine deep into the bottom of the boat. These more difficult installations may require hiring a pro. However, you can still carry out the diagnostic by looking and feeling for the telltale signs. And get them replaced before one gives way!
For the benefit of any interested reader, you can see my own mount replacement on YouTube video at the following link:

Marc Robic
Marc is a member of the Canadian Power & Sail Squadron. He and his wife sail their Catalina 270, Aquaholic 3, out of the Ile-Perrot Yacht Club in Montreal, where Marc spent 16 years as Harbour Master. They are regular Caribbean bareboat yacht charterers. With over 40-years experience, Marc is also an avid onboard do-it-yourselfer.
mrobic@aol.com