Ask Andrew – Straight talk: Engine and shaft alignment
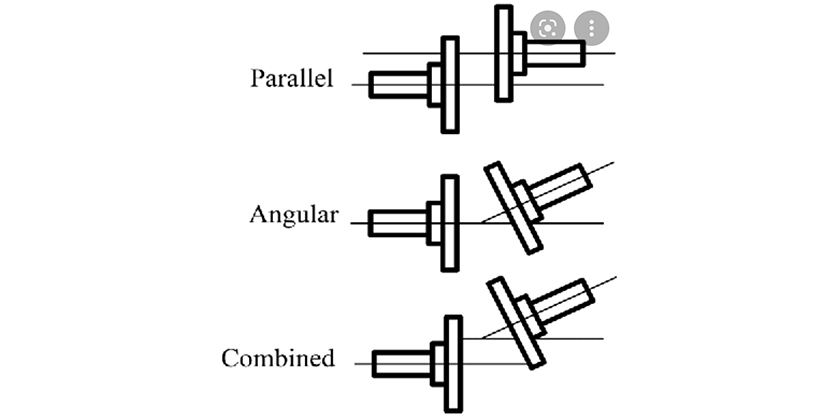
types of shaft/coupler misalignment
April 23, 2026
As I write this, boat yards are checking over systems, and re-familiarizing themselves with the boat they haven’t seen since the fall. Some of these checks can be itemized on a list; others are more intuitive: did the engine make this sound last year? Has the stuffing box drip-rate changed? Where is that darn vibration coming from? Some of these questions can be addressed by checking the alignment of the engine and it’s associated moving parts.
Sometimes big changes happen in the off-season: a new engine, a fresh cutlass bearing, or some fiberglass work on the engine beds has necessitated an alignment. Other times, the natural wear and tear of items under various forces requires an adjustment.
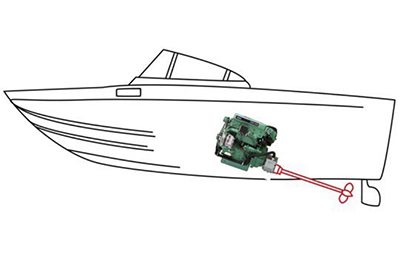
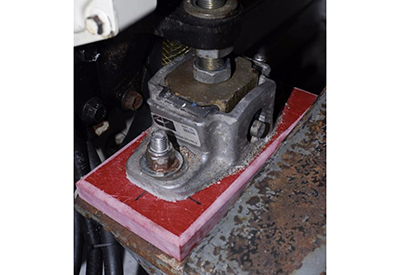
A typical engine-shaft set-up is fairly straightforward, though the way that all the components are aligned may be unfamiliar.
Angles
When a boat is designed and built, the angle of the propeller shaft is set first. The hole the runs through the hull, and the way that the prop strut is set in the hull is carefully measured by the builders (and during any major repair work done thereafter).
Also included in the original plans is the size and strength of the engine beds – based on the size and weight of the engine that will be mounted. The engine is then secured to this strong base using adjustable motor mounts (typically four – one at each corner of the engine). Each corner can then be independently adjusted up and down to provide a change to the height and angle that the engine sits at.
The term ‘alignment’ is this movement of the engine – raising, lowering and tilting in order to line it up correctly to the angle of the prop shaft. In a new boat, this is a fairly straightforward process. There isn’t a lot of play in the various parts, so there is little room for guessing or error.
In a boat that has had a few (or many) seasons behind it, things get a bit trickier: the engine bed and stringers that support the motor mounts become waterlogged and sag. The adjustable threads and nuts on the motor mounts rust and corrode. The cutlass bearing wears unevenly, creating play. The shaft bends or warps creating new issues.
So – before attempting any alignment, the following should be checked:
• The stringers/bed area that the mounts are secure to are solid. Use percussive testing and a moisture meter to confirm that they are not delaminated, and are strong enough (as designed) to support the weight and vibration of the engine
• That the mounts are in good condition: no cracks, wear, rust or corrosion that might prevent adjustments
• That the mounts are secured to the stringers/bed. This is usually done with lag bolts and an appropriate sealant. Ensure that the lag bolts are tight and secure
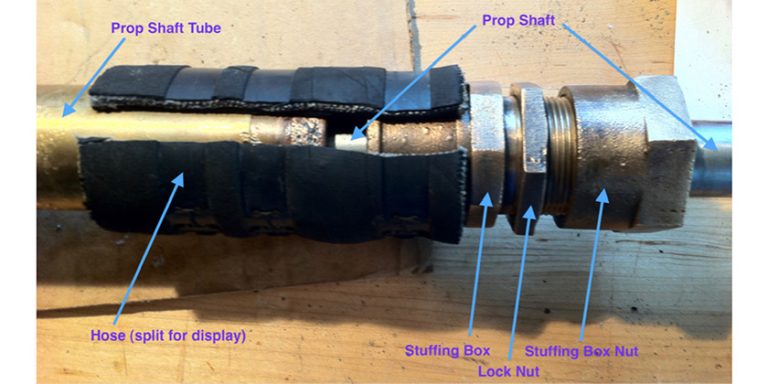
• That the propeller shaft is straight and true
• That the prop strut is secured and angled correctly
• That the cutlass bearing isn’t overly worn
• That the stuffing box is in good condition
• That the coupler is in good condition, and that the face of the coupler is true
If any of these items require repair (or are questionable), they should be addressed first. Attempting an alignment before addressing these items can be a losing battle!

Alignment steps:
1) Confirm that the shaft angle is correct. This is the base point that the alignment will achieve. If there is any play, movement or change during the alignment, you’ll be back to square one.
2) Slide the propeller shaft inward so that the shaft coupler butts against the engine coupler. With the couplers together, check the initial gap – this is done using a feeler gauge. A maximum of 0.001” of misalignment is acceptable for every inch of coupler face. Therefore, a 3” diameter coupler can have up to a 0.003” gap and still be considered aligned. Any gap larger than this value will require alignment.
3) The alignment is done by manipulating the engine’s motor mounts. If viewing the coupler at it’s face, consider the top, bottom and sides as the numbers on a clock. If the gap is wider at 9 or 3, the engine will need to be adjusted from side-to-side (which can get challenging with bigger engines). A gap at 12 or 6 will requirement adjustment up or down on the motor mounts.
4) Once adjustments are made, continue to re-check the gap. With each check, spin the coupler 180 degrees and cross-check.
5) Once the gap is acceptable, the bolts can be installed and tightened. If possible, this should be done by tightening sequentially, opposite each bolt. Fasteners of appropriate strength should be used, and a torque wrench confirming that the bolts are secure. If in doubt, check with a qualified marine tech on bolt type and strength, washer type and torque spec.
6) Once the work is complete, the motor mounts should be set in their ‘mid-range’ – not at the extreme ends of their travel, as this prevents any future fine-tuning.
Much of this work can be done using minimal tools and experience – but if in doubt at any step, check with a qualified marine technician. Often, some minimal adjustments and maintenance each season can enhance enjoyment and comfort aboard for the rest of the year.

Andrew McDonald is the owner of Lakeside Marine Services – a boat repair/maintenance firm based in Toronto. Andrew has worked in the marine industry for 12 years and is a graduate of the Georgian College ‘Mechanical Techniques – Marine Engine Mechanic’ program.