Ask Andrew: Mid-summer Q&A – Part 2: Leaks – Keeping water on the outside
Aug 9, 2018
After the stress and rush of spring prep, taking time to get your gear comfortably on board and sorted, taking the boat out for a shakedown cruise to sort out the ‘big’ problems, you may have felt that your boat is set for the season. But, by this point in the season, you may begin to notice some of the smaller problems: a cupboard door that won’t stay closed, a burned out bulb, and the puddle left on the cabin sole from the last rainfall.
Leaks are one of my pet-peeves, aboard. Water should stay on the outside of the boat. Unfortunately, the manufacturing processes used, the materials that go into boat-building, and the fact that boats are left open to the weather and marine environment make them susceptible to leaks, drips and cracks. There are many products available on the market sold as marine sealants and caulking – and it can be difficult to compare the brands and the marketing behind them. So, rather than focusing on the products available, I’d like to draw attention to the best methods to re-seal hatches, windows, lights and hardware.
 To begin, it’s important to note that a boat is made of a series of curves while most hatches, windows and items of hardware are designed square.
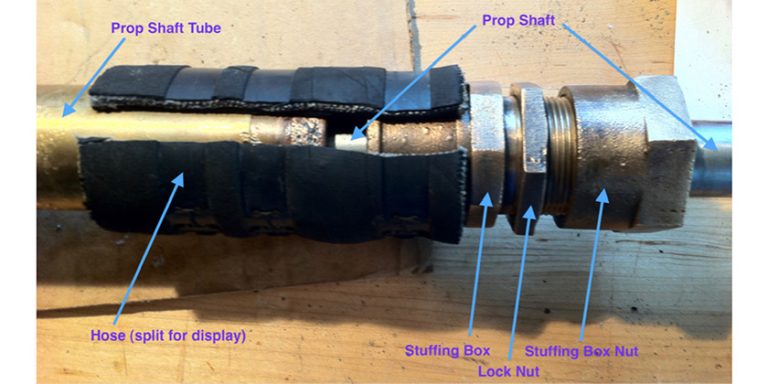
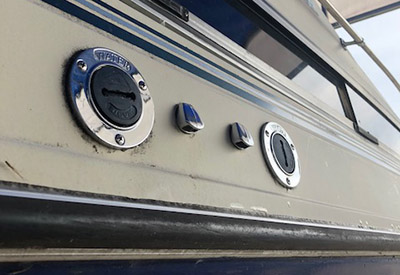
Secondly, most elements are secured with hardware: bolts/nuts, machine screws and rivets. The hardware runs through fiberglass and it’s core, and is sealed with caulking. The caulking serves a dual purpose of filling the gaps between components, and sealing the mounting holes that are drilled in fiberglass.
Whether installing a new piece of hardware, or re-sealing a leak, the procedure should be the same:
1) Remove the existing hardware by removing and extrusions, screws, machine bolts/nuts and excess caulking/sealant
2) Clean/prep the area – use a gasket scraper or sharp knife to clean away all caulking, dirt and debris. Clean the area with acetone.
3) Once the debris, dirt and old caulking is removed, it is much easier to see the state of the deck/hull beneath. Often, mounting holes are damaged or stretched and won’t support the replacement of hardware. I’ve found that filling the original holes with two-part epoxy or thickened fiberglass resin will allow new pilot holes to be drilled, which adds to keeping the mounting surface water-tight
 4) Dry-fit the hardware and mark the correct location of mounting hardware. Choose the size and type of hardware to be used, and select the appropriate drill bit to match the mounting screws/bolts. Drill pilot holes.
5) Because the next step will make things quite messy, it’s wise to prepare for that at this step. I run painter’s tape around the outer edge of the hardware to be mounted – both on the deck/hull surface, as well as on the hardware itself. This ensures that when the caulking is squeezed out of the gap between surfaces, it will be end as a clean bead, rather than a sticky mess.
6) Caulk the mounting surface. More is better. Wear gloves and keep paper towels handy. Acetone cleans up caulking really well.
7) Line up the hardware and line up the pilot holes – begin screwing/bolting in place. Try to work from one corner outward, allowing the caulking to squeeze out liberally onto the tape placed in step #5. One all the mounting hardware is in place and tight, run a gloved finger along the caulking edge – this will clean up excess, as well as serving to force caulking into any/all gaps.
8) Wait 15 minutes for the caulking to set, and then remove the tape on the mounting and hardware edges. This should leave a clean line, and a properly sealed piece of hardware.
 a Brad Point drill bit. It’s the style that I typically use for drilling in Fibreglass, because an exact centre point can be lined up with the tip, and the tip prevents the drill bit from wandering. The drill bit should create a pilot hole such that the threads of the screw can still have a healthy bite into the material it’s being drilled into.
Finally – remember that any time a screw is removed and replaced, a crack or gap develops or a piece of hardware is mounted, it should always have gaps filled with caulking that will prevent water from entry into the mounting surface.
Enjoy a great (dry) August on the water!
 Andrew McDonald is the owner of Lakeside Marine Services – a boat repair/maintenance firm based in Toronto. Andrew has worked in the marine industry for 12 years and is a graduate of the Georgian College ‘Mechanical Techniques – Marine Engine Mechanic’ program.